


How to Tie Fila Shoe Laces: 8+ Beautiful, Simple, Stylish Styles
You own a pair of "super cool" Fila but don't know how to tie your shoes beautifully and stylishly? Do you want to find new and more beautiful ways to tie Fila shoelaces to refresh the look of your favorite shoes, while expressing your unique personal style? Through the article below, let's learn about 8 ways to tie Fila shoelaces quickly and fashionably with Celidior!
Why Is Lacing Style Important With Fila Shoes?
At first glance it may seem trivial, but the way you tie your shoelaces greatly affects the aesthetics. Let's find out with Coolmate some meanings when tying beautiful Fila shoes:
- An aesthetic highlight: A suitable lacing style can enhance the design of a Fila shoe, making it look more impressive. For example, a pair of bulky Fila Disruptor 2s can be matched with a different lacing style than an elegant pair of Fila classics.
- Express your personal style: The lacing style is the way for you to express your own unique fashion sense.
- Factors that determine comfort: The lacing style and tightness directly affect the fit of your foot, the feeling of comfort when you move and run.
- Ensure fixation: A firm lacing style will help the shoelaces to be fixed, not loose or slip off during movement.
- Improve aesthetics: Clean and beautiful shoes combined with the right lacing style will create a more harmonious and neat overall look.

Beautiful fila shoe lacing brings many important meanings
Some Basic Preparations Before Tying Fila Shoe Laces
Before you start trying out beautiful fila shoe lacing styles, you should prepare a few simple things:
- Choose the right shoelace length: The length of the shoelace depends on the number of eyelets on your Fila and the lacing style you choose. Measure your old laces or consult the manufacturer's specifications to choose the right new laces.
- Clean the shoelaces (if using old laces): Clean shoelaces help the overall look of the shoe look neater. This is also an important part of proper shoe care.
- Remove the old laces and flatten the new laces: Remove the old laces completely from the shoe. If using new laces, straighten the laces for easier handling.
Some basic preparation steps before tying fila shoe laces
Discover 8+ Most Beautiful and Popular Ways to Tie Fila Shoe Laces
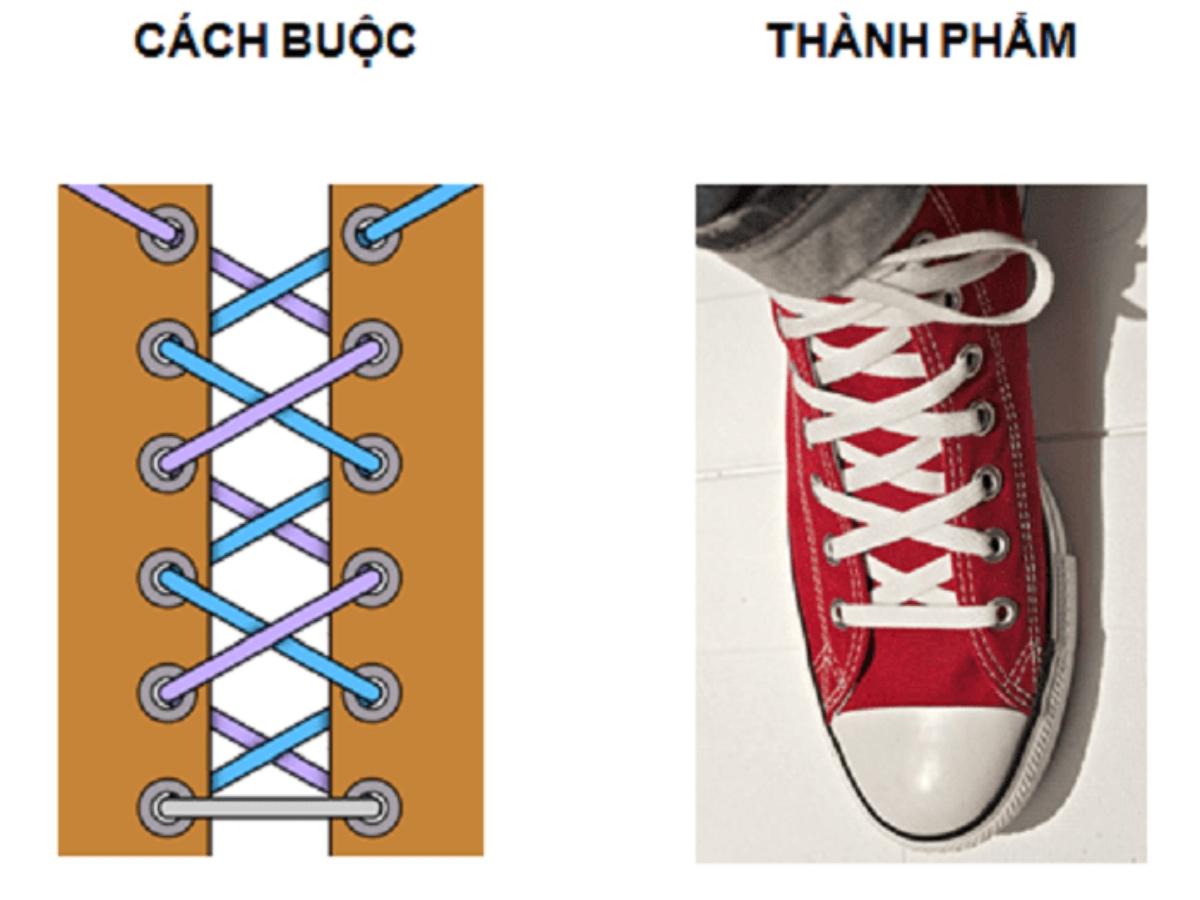
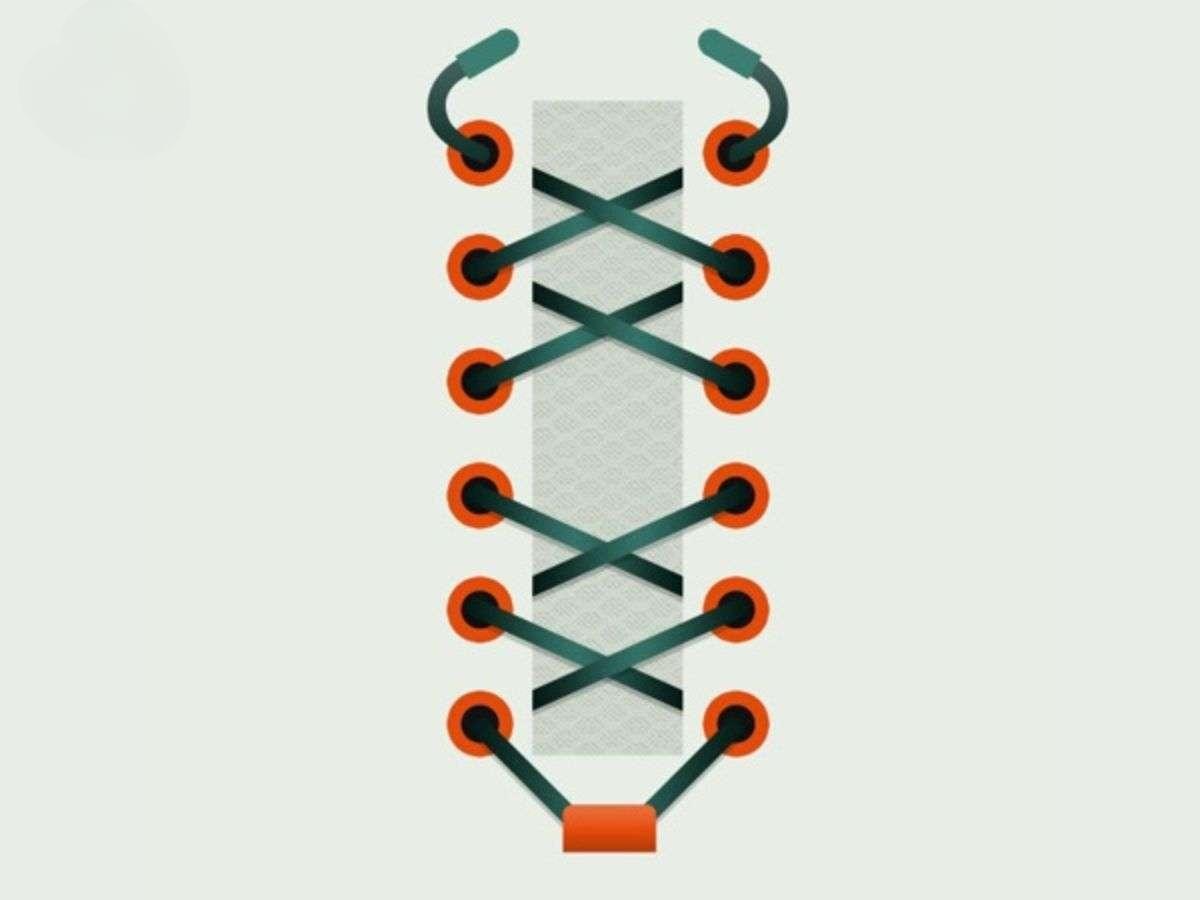
1.Criss-Cross Style
This is definitely the simplest, most beautiful and popular way to tie Fila shoe laces that you should do. The Criss-Cross style, also known as the fishbone style, is easy to do, ensures firmness, and is suitable for almost all types of Fila shoes.
How to do:
- Start by threading the cord straight through the two holes in the bottom row, from the outside in (the main cord is on the outside). Make sure the two ends are the same length.
- Take the right end of the cord, cross it over and thread it into the next hole (second row) on the left, from the outside in.
- Do the same with the left end: cross it over and thread it into the next hole (second row) on the right, also from the outside in. Make sure to thread the left cord under the right (or vice versa, it's up to you, but be consistent).
- Continue repeating the cross-over and threading until you have reached the end of the holes.
- Tie a knot at the end and you're done!
How to tie fila shoes in fishbone style
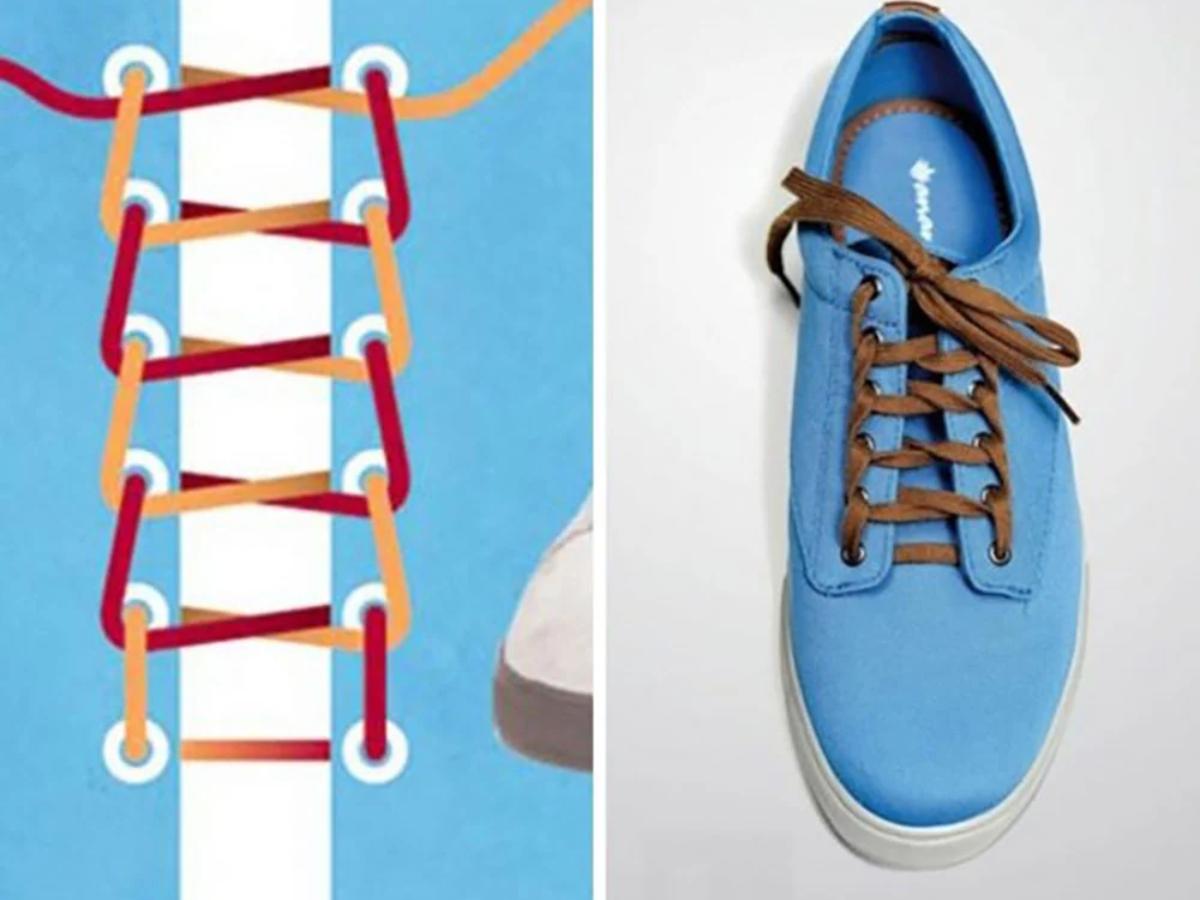
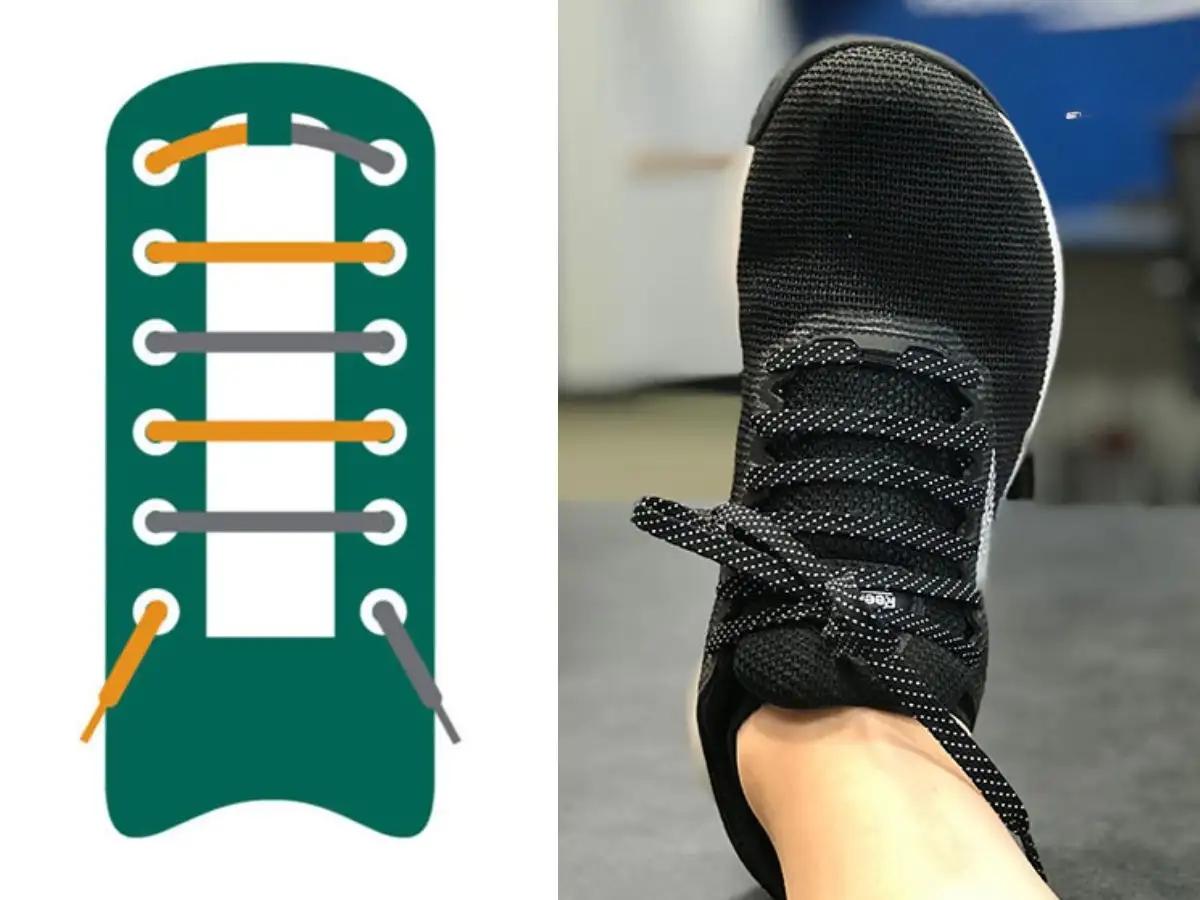
2. Straight Bar Style
If you love clean, minimalistic looks and want your Fila shoes to look elegant, the Straight Bar is a great choice. This Fila lacing style creates parallel lines, giving it a very aesthetic look.
How to do:
- Thread the string straight through the two holes in the bottom row, from the inside out (the main string is on the inside). Make sure the two ends are equal.
- Take the left end of the string and thread it straight up the hole right at the top (the second hole from the bottom, on the left), from the inside out.
- Then, thread this end horizontally into the hole opposite the same row (the second hole from the bottom, on the right), from the outside in.
- Take the right end of the string (now in the bottom right hole), and thread it straight up the hole third from the bottom on the same row (skipping the second hole that the string has passed through), from the inside out.
- Thread this end horizontally into the hole opposite the same row (the third hole from the bottom, on the left), from the outside in.
- Repeat the process, threading the left end up the fourth hole on the same row (from the inside out), then thread it horizontally into the hole opposite the other (from the outside in). Continue alternating until all the holes are used.
- Hide the knot inside the shoe or tie a neat bow.
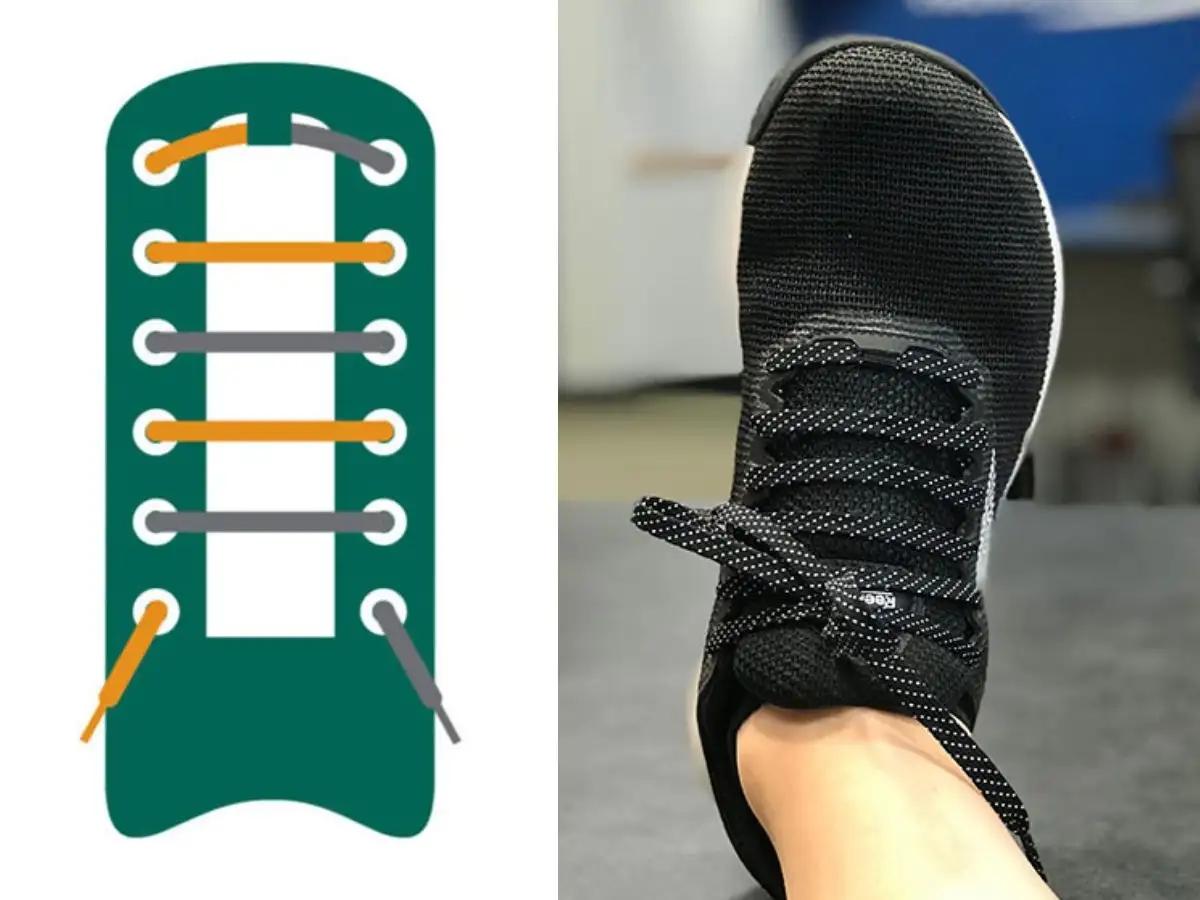
How to tie Fila shoes in the Straight Bar style
3. Hidden Knot Style
This hidden lacing method for Fila shoes gives a very seamless, clean and modern look. It is especially suitable for the Fila Disruptor 2 or sneakers with bold designs, or simply when you want a sophisticated look.
How to do:
- Start the same way as the Straight Bar: thread the lace straight through the bottom two eyelets, from the inside out.
- Follow the steps to thread the laces to create parallel horizontal bars as instructed in the Straight Bar.
- Important step: When you reach the last two eyelets (top row), instead of threading the laces out to tie a knot, thread both ends of the laces straight up but on the inside of the tongue (not through the eyelets).
- Pull the two ends of the laces tight and tie a neat knot. This knot will be discreetly hidden under the tongue or on the inside of the shoe.
- Adjust the horizontal bars to make them even and beautiful.
How to tie fila shoes with unique hidden knot style
4. Ladder style
As the name suggests, the Ladder style creates a ladder-like shape, providing a high level of stability and a strong, unique look. This is the ideal choice if you want to express your personal style or need maximum stability when moving.
How to do:
- Thread the wire straight through the two bottom holes, from the inside out. Make sure the ends are even.
- Thread both ends straight up into the hole right on the top (second hole), from the inside out. You now have two loops on each side.
- Take the left end of the wire and thread it horizontally under the right vertical wire (the loop created in step 2).
- Continue threading this left end straight up into the next hole on the same side (third hole), from the inside out.
- Do the same with the right end: thread it horizontally under the left vertical wire, then straight up into the next hole on the same side (third hole), from the inside out.
- Repeat steps 3, 4, 5, threading it horizontally under the opposite vertical wire and then up into the next hole on the same side, until all the holes are used up.
- Tie a knot at the end.
How to do a Ladder lacing
5. Zipper type
This Fila lacing style creates a visual effect like a zipper, extremely eye-catching and impressive. This is a unique choice if you want your sneakers to really stand out and show off your creativity.
How to do:
- Thread the wire straight through the bottom two eyelets, from the inside out.
- Take each end of the wire and thread it under the horizontal section you created in step 1 (creating a small loop on each side).
- Cross the two ends of the wire. Take the right end of the wire and thread it into the next eyelet on the left, from the inside out.
- Take the left end of the wire and thread it into the next eyelet on the right, from the inside out.
- Repeat steps 2 and 3 on the current row of eyelets: thread each end of the wire under the diagonal section you created in the previous step, then cross it and thread it into the next eyelet on the opposite side (from the inside out).
- Continue until all the eyelets are gone.
- Tie a knot at the end.

How to make a simple zipper shoe lacing style
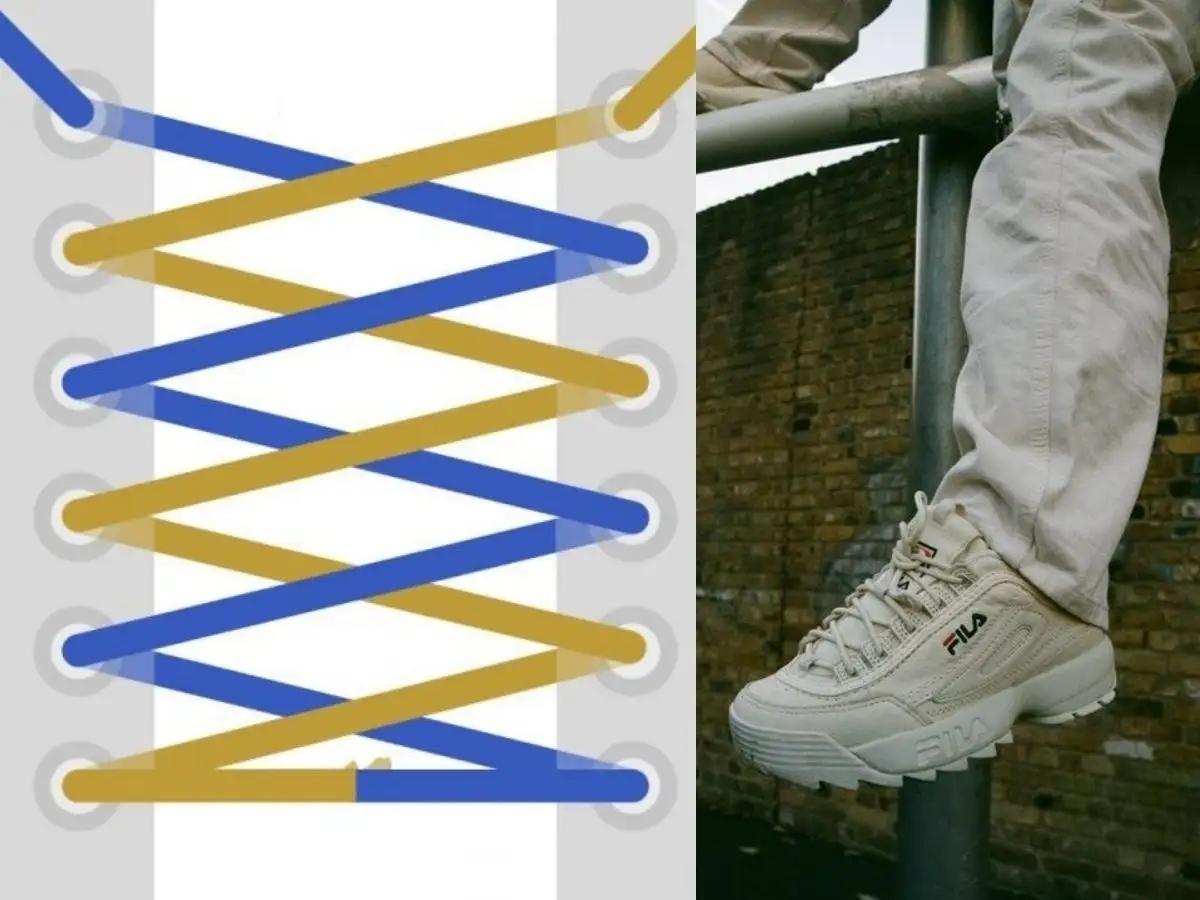
6. Sawtooth type
The Sawtooth style has a rather unique structure with one side of the lace running straight and the other side running diagonally. The biggest advantage of this Fila shoe lacing method is its convenience, easy adjustment of tightness and helps you put on/take off your shoes faster.
How to do:
- Thread the string straight through the bottom two holes, from the outside in.
- Take the left end of the string and thread it straight up the hole right at the top, from the inside out. Then, thread it horizontally to the hole opposite the same row, from the outside in (forming a second horizontal bar).
- Take the right end of the string and thread it diagonally up the third hole from the bottom to the left, from the inside out. Then, thread it horizontally to the hole opposite the same row (the third hole on the right), from the outside in.
- Repeat the process: The left end of the string always goes straight up the next hole on the same side and then across. The right end of the string always goes diagonally up the next hole on the opposite side (skipping a row) and then across.
- Repeat until all the holes are gone.
- Tie a knot at the end.
Unique and precise way to tie Sawtooth shoes
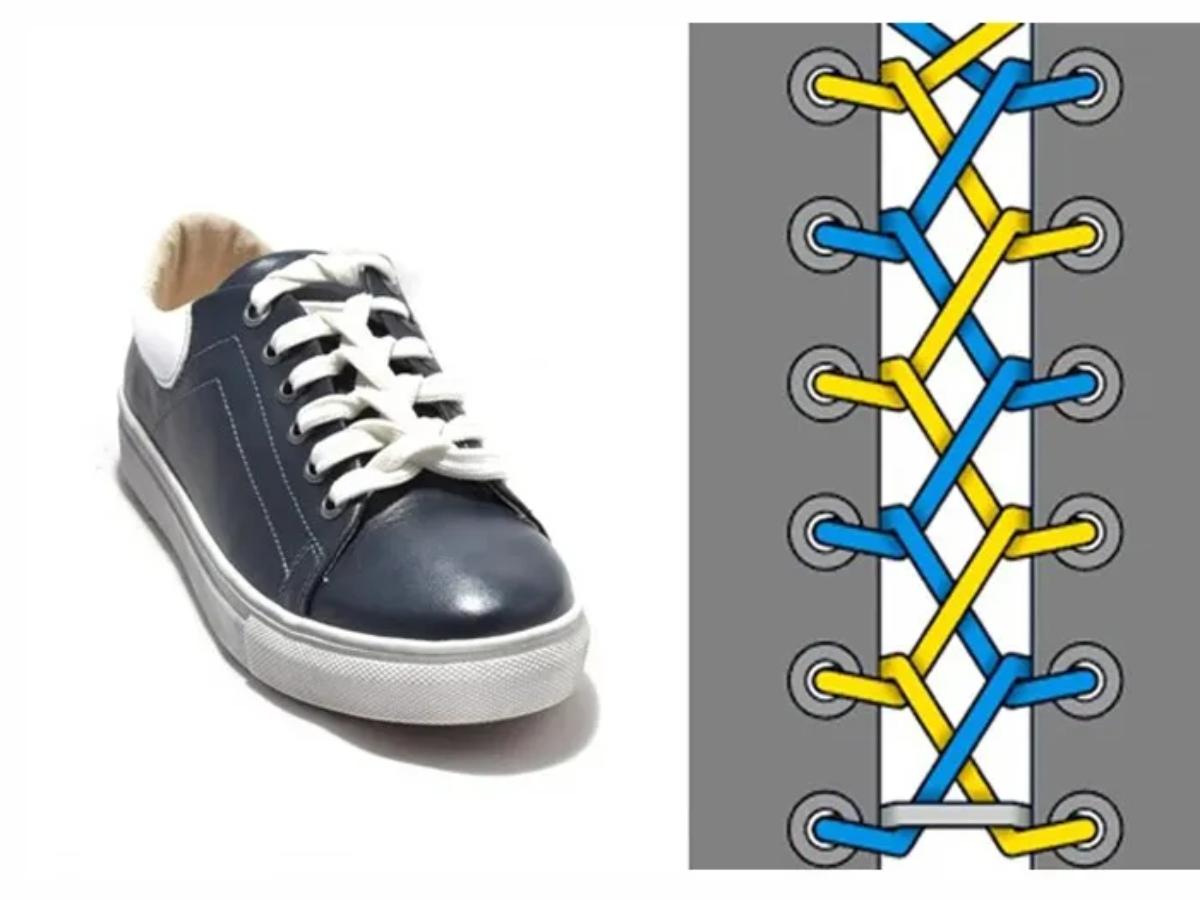
7. Double Back Style
This lacing style is especially useful when you are doing strenuous activities, playing sports, needing maximum firmness and comfort.
How to do:
- Thread the wire straight through the two bottom holes, from the inside out.
- Take the right end of the wire and thread it diagonally down the second hole on the left, from the outside in.
- Take the left end of the wire and thread it diagonally down the second hole on the right, from the outside in (like Criss-Cross).
- Take the right end of the wire (in the second hole on the left), and thread it straight up the hole right above the top (third hole on the left), from the inside out.
- Do the same with the left end of the wire (in the second hole on the right), and thread it straight up the hole right above the top (third hole on the right), from the inside out.
- Now, repeat steps 2 and 3 on the current row of holes. Take the right end of the wire (third hole on the right) and thread it diagonally down the fourth hole on the left (from the outside in). Take the left end of the wire (third hole on the left) and thread it diagonally down the fourth hole on the right (from the outside in).
- Continue repeating the process of threading straight up the top hole, then diagonally down the next hole on the opposite side until finished.
- Tie a knot at the end.
Double Back lacing makes the shoe sturdy
8. Loop Back Style
The Loop Back style creates quite unique decorative loops, especially suitable for high-top or mid-top Fila shoes. This is a beautiful Fila shoe lacing style, helping to create a highlight as a fashion accessory and can increase flexibility for the ankle. This beautiful Fila shoe lacing method for women is also very popular.
How to do:
- Start with a Criss-Cross or Straight Bar for the first few rows of eyelets (depending on your preference).
- Around the middle of the shoe or near the top of the shoe, instead of going diagonally across to the opposite eyelet, run each end straight up the top eyelet from the inside out.
- Then, run each end back down through the same vertical loop you created in step 2.
- Cross the two ends and thread them through the next eyelet on the opposite side (like a regular Criss-Cross).
- Repeat steps 2-4 if you want to create more loops in the upper rows of eyelets.
- Finish by tying a knot.
How to do the unique Fila Loop Back shoe lacing style
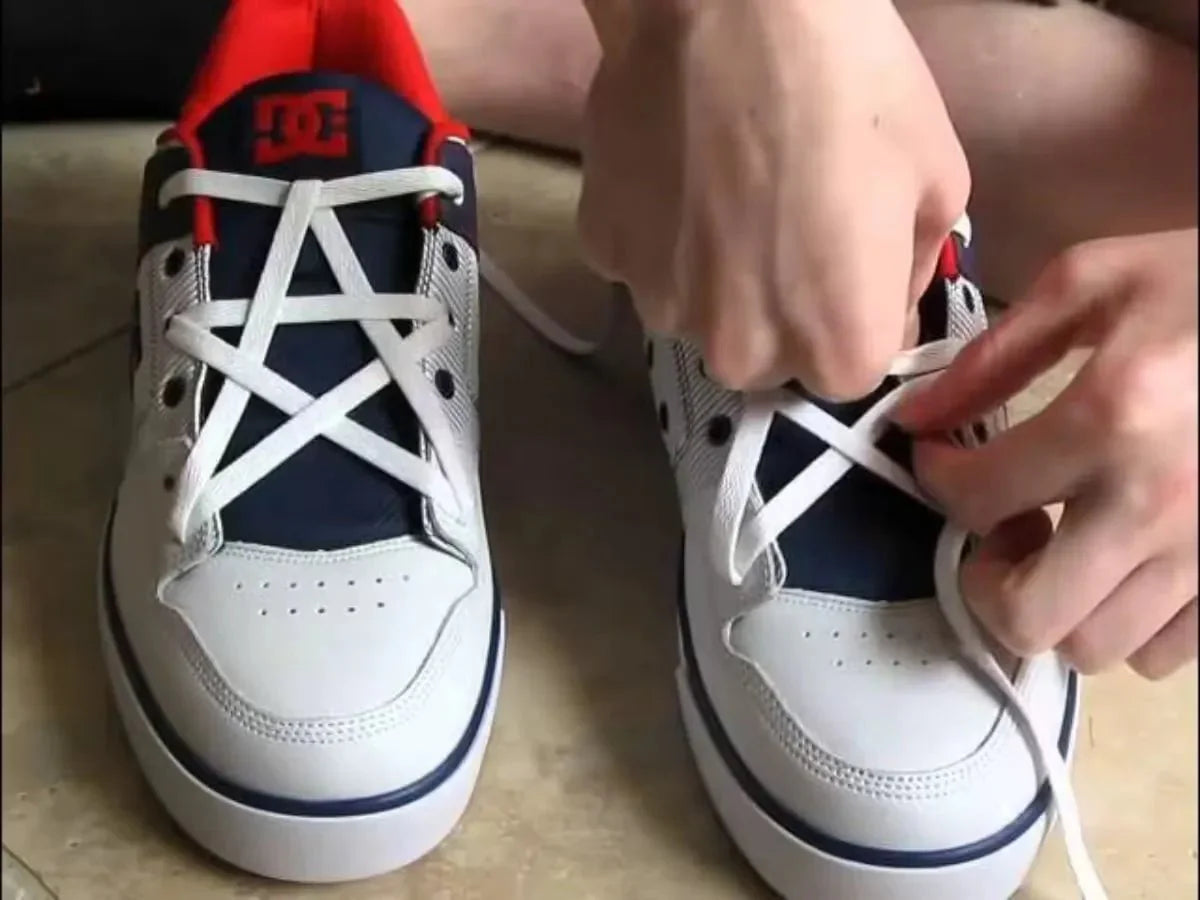
9. Fila Star Lacing Style
The Fila Star Lacing is not just a regular lacing method, but also a unique style statement. With the laces meticulously interwoven, creating a prominent star shape on the surface of the shoe, this lacing style immediately attracts all eyes.
How to do:
- Thread the wire straight through the two holes in the third row (from the bottom up), from the outside in.
- Take the left end of the wire and thread it straight up to the top hole (last row) on the same side, from the inside out.
- Thread this end diagonally down to the hole in the third row on the right, from the outside in.
- Thread this end straight up to the top hole on the right, from the inside out.
- Take the original right end of the wire (in the third hole on the right), and thread it diagonally up to the top hole on the left, from the outside in.
- Thread this end straight down to the hole in the third row on the left, from the inside out.
- You will see a star shape gradually appear. Adjust the lines to balance and tie a knot on the inside or outside as desired. (The method may vary depending on the number of holes).

Make Fila star lacing style to give the shoes their own beauty.
Useful Tips To Help You Tie Your Fila Shoe Laces More Beautifully And Durablely
In addition to information on how to tie shoelaces, you need to pay attention to the following good tying tips:
- Adjust the appropriate tightening: Do not tighten too tight to cause discomfort, and do not loosen the shoe so that it is not fixed. Find the right tightening to be comfortable when moving.
- Hide the excess lace neatly: After tying the knot, you can thread the excess lace inside the shoe (under the tongue or inside) to increase aesthetics.
- Note the number of eyelets: Different Fila lines have different numbers of eyelets (Fila Disruptor 2 usually has 7 pairs of eyelets, Fila Ray Tracer may have less). This affects the required lace length and the appropriate lacing style.
- Shoelace care: Keeping shoelaces clean and avoiding fraying helps them last longer. This is part of comprehensive shoe care.
Pay attention to some tips for tying Fila shoe laces properly and beautifully
Answering Frequently Asked Questions About How to Tie Fila Shoe Laces
Let's find out with Celidior some frequently asked questions about how to tie Fila shoe laces below:
1. How long should Fila shoelaces be?
The length of the laces depends on the number of eyelets in your shoe (usually 6-8 pairs for Fila) and the lacing style you choose (more complex styles require longer laces). On average, laces are between 120cm and 160cm long. It is best to measure your old laces or consult the Fila manufacturer for information.

Note that you should only buy Fila shoelaces that are about 120cm to 160cm long.
2. How to tie Fila shoe laces so they don't come undone while running?
To keep your laces secure during movement, you should:
- Choose a secure lacing style like Ladder or Double Back.
- To keep your laces secure during movement, you should: Choose a secure lacing style like Ladder or Double Back. Tie the laces tight enough, especially at the ankle. Tie the final double knot (e.g. Reef Knot/Square Knot – tie two bows on top of each other properly).
- Tie the final double knot (e.g. Reef Knot/Square Knot – tie two bows on top of each other properly).
3. Which Fila shoe lacing style is the most beautiful and easiest to do?
- The easiest and most popular: Criss-Cross.
- Beautiful, simple, neat: Straight Bar.
Some beautiful and easy to do Fila shoe lacing styles
4. Where to buy quality replacement Fila shoelaces?
You can find replacement shoelaces at:
- Footwear accessories retail stores.
- Major e-commerce platforms.
- Sneaker specialty stores.
- Official Fila website (if accessories are sold).
Be careful to choose the right length, color and material of laces to suit your shoes and your preferences.
Conclude
Knowing many ways to tie Fila shoelaces not only helps your sneakers look new and more impressive, but is also a way for you to express your own style, personality and ensure comfort when moving. Hopefully with the detailed instructions and small fashion tips in this article, you have more ideas to experiment and refresh your favorite Fila shoes.
Don't forget to visit CeliBlog regularly to update more knowledge and tips about men's and women's fashion!


Written by Celi Dior
Leave a comment
This site is protected by hCaptcha and the hCaptcha Privacy Policy and Terms of Service apply.